
Plan a kids’ cherry birthday party around red and ivory decor, a cherry cake and a DIY charm station that doubles as the favor activity. Choose a simple meal or an afternoon dessert gathering, then give food, crafting and cake their own surfaces. This guide includes setup ideas and quantities for 12 or 24 guests.
This plan suits a kids’ cherry birthday with a simple meal or an afternoon of cake and charm-making. Start by choosing which of those formats you want, then use the room layout, menu, and timing below to make it work. The featured cherry keychain kit becomes a purposeful part of the party rather than an unrelated extra.
Paid affiliate links: This article includes Amazon Creator Connections campaigns. As an Amazon Associate, Crow & Crown earns from qualifying purchases.
Choose a kids’ cherry birthday dinner or dessert party
For dinner, plan a seat for each guest and set the craft activity at a separate table. You can begin with a welcome drink, serve the meal, then invite guests to make a keychain while refreshments and dessert are prepared.
For a dessert gathering, put “cake, drinks, and cherry keychain making” on the invitation. This makes the food expectation clear and lets guests know there will be something to do. Choose an afternoon or early-evening time that fits the lighter menu, and provide a workspace for everyone who wants to take part.
Ask about dietary needs and whether guests want to join the activity when they RSVP. Making a favor should be an invitation, not a requirement; a few preassembled pieces let someone take one home without working on it during the party.
Cherry birthday party decorations in red and ivory
Use ivory as the base on the table and red in selected details: a napkin, menu heading, flowers, or the cake. Let green appear only where it belongs to the cherry illustration or fruit. Repeating the same red in a few places creates a clearer effect than buying every item with a cherry print.
Lay out the pieces you already own before shopping. Plain dinner plates, clear glasses, and a neutral tablecloth leave room for the cherry details. A simple menu card can connect the table to the invitation without adding another physical prop. If you want coordinated paper details, browse our birthday party printables and choose only the pieces your setup needs.
For flowers, use low arrangements that leave guests able to see across the table. Keep the center clear if serving family-style. If the table is small, put the flowers near the dessert and let the place settings carry the color.
A cake-inspired napkin for the dessert table
If you want one playful printed detail, the xo, Fetti Happy Birthday paper napkins bring together red cherry corners, rainbow sprinkles, pink lettering and a pale blue icing-style border. Use them beside the cake or on plain ivory dessert plates, keeping the main table red and ivory so the extra colors stay a small accent.

25 napkins per pack.
How many to order: For cake service, allow two napkins per guest. One 25-pack covers 12 guests; two packs cover 24 guests with two napkins left over. Keep plain backups for the meal, drinks and spills. Put the printed napkins at the dessert station rather than beside the loose charm-making supplies.
Give food, crafting, and dessert separate surfaces
The craft station needs a clean, dry workspace with good light. Put food and drinks on a nearby side table so a spill does not scatter the components or wet a finished favor. Lay out shallow trays for the parts and a finished example where people can see it.
Arrange chairs before decorations. Each person needs room for their hands and materials, not just a place to perch. If you cannot fit everyone at once, offer the activity in small groups while others talk or enjoy dessert.
Keep the entrance and food route open. A clearly placed favor basket near the exit gives finished pieces a home until guests leave and prevents them from getting mixed in with dirty plates.
Set up a DIY cherry charm party station

The nesthugcare cherry keychain DIY kit gives the party an activity and a take-home favor in one. Its cherry charms and heart-chain detail fit the red-and-ivory concept, so there is no need to introduce a different favor theme.
Open the kit before the event and assemble one example using the supplied directions. Check which pieces are included, whether you need tools, and how long assembly takes you. Then prepare a small instruction card based on that actual process; do not assume guests will understand the assembly from the finished photograph.
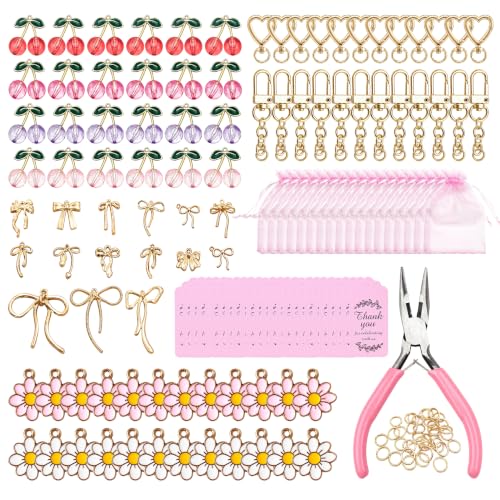
Cherry keychain favor kits
Divide supplies into individual portions or clearly labeled trays. Keep any spare components together, and set out only the tools the instructions call for. These small craft parts belong on the activity table rather than beside food. For children, follow the kit’s stated age guidance and have an adult handle tools and help with assembly.
If you prefer ready-made favors, assemble them ahead of time and place each one on a simple thank-you card. Guests can still enjoy the cherry detail without an activity. Choose the version that suits your time and the people attending.
Plan the meal around hosting, not the color red
The food does not need to contain cherries in every course. For dinner, choose a reliable main, a vegetable dish, and a side that you can prepare without leaving guests alone for long stretches. A baked pasta with salad or roast chicken with potatoes can both work; your guest needs and kitchen capacity should decide.
Let the cherry flavor appear in dessert or a welcome drink. For an alcohol-free option, add a little cherry juice to sparkling water and adjust to taste, with a citrus slice if you like. Display the ingredients and offer plain water separately.
For a dessert gathering, choose a centerpiece cake or tart and a second option for guests whose dietary needs it does not meet. Keep serving utensils with each dessert and make sure the food table has enough light for people to see labels and portions.

Cherry birthday cake ideas that tie the table together
An ivory cake with a red border, cherry decoration, or short birthday message brings the palette together. Discuss any fruit or decorative material with the baker so the finish suits the cake and can be served as intended.
Set the cake on a stable surface with space around it for photographs and serving. Put plates, napkins, a knife, and a server nearby before guests arrive. Ask one person to take photos so the birthday guest can enjoy the moment.

Use the cake as the focal point, with a few red details and enough clear space around the stand for photographs and serving.
Quantity guide for 12 or 24 guests
- Keychains: Plan one finished favor per guest. The featured kit is listed as 24 sets; check the selected variation and count its contents when it arrives.
- For 12 guests: Prepare 12 portions for assembly and retain the remaining pieces as backups or for preassembled favors.
- For 24 guests: A nominal 24-set pack leaves no complete spare favor, so check every component in advance.
- Dessert service: Start with 15 small plates for 12 guests or 30 for 24, then add meal service separately.
- Napkins: Allow two or three per guest for drinks and dessert as a starting point, with plain backups available.
For the activity, workspace can matter more than quantity. Test one seated station with the actual trays and tools before deciding how many people can craft at once.
A relaxed order for the celebration
Welcome guests with a drink and give everyone time to arrive. For dinner, serve the meal before opening the craft station; for a dessert gathering, begin with the activity once guests are settled. Leave the cake as the shared moment that brings everyone back together.
Keep completed favors in one labeled area and let guests add a name or thank-you tag. As the party winds down, offer water and remind people to collect their finished piece. The favor will feel connected to time spent together rather than something added at the door.
What to prepare ahead of time
Two weeks before: Confirm the format, guest count, dietary needs, and dessert. Order only the missing supplies after counting your own tableware.
A few days before: Open the kit, make a sample, count components, and prepare individual portions or trays. Test the place setting and print menus or activity directions.
On the day: Set up the dry craft station first, then food and dessert. Add flowers and red details after the practical pieces fit. Leave time to get ready and sit with your guests—the activity and cake give the party its structure, so the host does not have to fill every moment.
Explore other birthday themes
Still choosing a direction? These are separate party plans with their own palettes and supplies.


